SharePoint Framework
- A new development (page and part) model for building SharePoint customization.
- It enables client-side development for building SharePoint experiences.
- It facilitates easy integration with the SharePoint data and provides support for open source tooling development.
I’m not focusing on what is SPFx and why we use it etc as there are lot of blogs information available, I’ll focus on how to develop and deploy components using SPFx approach.
To have an overview of SPFx, please follow the below tutorials and also look for others as well 😉
Introduction:
This post introduces you how to develop and deploy SPFx client side web part for SharePoint Server On Premises Environment.
Prerequisites:
- SharePoint Server 2016 with September 2017 CU
- SharePoint Feature Pack 2 to enable SharePoint On Premises development
- Node JS v 6.12
- SPFx version 1.4 (I’m using 1.4, you can also use 1.3) both supports SP On Premises development
For setting up environment please follow the steps mentioned in the video tutorial
Tools & Technologies
- PnP JS Core (To Perform CRUD operations), take a look on PnP JS Core
- VUE JS (JS framework to render the list items)
- Node JS, TypeScript, Gulp and SharePoint Yeoman Generator to create basic scaffolding/structure of the project and to perform different operations.
- Visual Studio Code (IDE for SPFx Component development)
lets start step by step
1.Preparing basic project structure / scafolding
-
- create a folder on file system with the name “SPFxDemo”, i’ve created under C:\work\SPFxDemo
- Run Node JS command line as Admin
- change the directory to “c:\work\SPFxDemo”
- create project by typing command “yo @microsoft/sharepoint”
- enter the solution and webpart name, description etc, make sure you selected baseline package for target component “SharePoint 2016 onwards, including SharePoint Online” means this component can be used in SharePoint On Premises and for SharePoint Online as well
- here is my configurations, see the below screenshot

- once the scaffolding is done, you would see a success message as


2. Installing / Configuration of PnP JS Core and VUE JS
-
- npm install vue@2.3.4 –save
- npm install sp-pnp-js –save
- Once PnP and Vue JS installation done, open the code by typing “code .” command

-
- Open config -> config.json file and add vue js in externals

Hosting SPFx component assets to SharePoint: we need to store SPFx web part assets somewhere to reference it so you can use CDN or SharePoint server, in this post i’m using SharePoint server document library to store web part assets
-
- Create a folder “DemoFiles” in document lib in site contents and add that path to cdnBasePath in Config -> write-manifests.json file

Getting data from SharePoint using PnP and Rendering using VUE JS:
-
- Open webpart main file src -> webparts -> spfxDemo -> SpFxDemoWebpart.ts and add these two references into the file
- import * as Vue from ‘vue’;
- import * as pnp from ‘sp-pnp-js’;
- Render method code
- Open webpart main file src -> webparts -> spfxDemo -> SpFxDemoWebpart.ts and add these two references into the file

Testing component on local workbench:
- Run the command “Gulp Serve” to run the application in the Local workbench, it will show nothing ;); you need to run your webpart under SharePoint server workbench as it is SharePoint On Premises component getting the data from SharePoint.
- open the workbench from your SharePoint server “http://win-464hm9kh0hb:2016/_layouts/15/workbench.aspx“
- click on + button, system will display all available components so select SPFxDemo as shown


Finally here is the result 😉 we are getting the data from SharePoint list and rendering it using VUE JS

Edit the webpart to give any title in the description property.
3. Deploying SPFx client side webpart to SharePoint Server On Premises
MAKE SURE YOU HAVE CONFIGURED APPS FOR CATALOG PROPERLY, How to Configure it click HERE
- Open Node JS command prompt and enter “CTRL + C” to terminate the current process
- Run the following commands one by one
- gulp bundle –ship
- gulp package-solution –ship
- Copy the webpart asset files from the project directly directory, these are under /temp/deploy, for me here is the location “C:\work\SPFxDemo\temp\deploy”
- Place them in the hosting location, I’m using document library so here is that path “http://win-464hm9kh0hb:2016/Documents/DemoFiles“, publish the asset files if you want to show the webpart to anonymous users.
Note: By Default json files are blocked to uploaded into SharePoint, so remove json file from the list Central Administration – > Security -> General Security section -> Define blocked types types
-
- Open Apps catalog site and upload the webpart .sppkg file, it is under /sharepoint/solution/ in the project directly….I’ve this path “C:\work\SPFxDemo\sharepoint\solution”
- When you upload the package, it will prompt you from where webpart will get the contents as shown

- Click on deploy and deployment is now DONE
4. Adding SPFx webpart to a Page
-
- Go to site contents -> add an app -> select sp-fx-demo-client-side-solution app from the apps.

-
- Once app would be added, create a page and add that webpart on SharePoint page; as i didn’t defined any group for the webpart so it would be under the “Others Categories“

-
- Click on Add button, here we go 😉

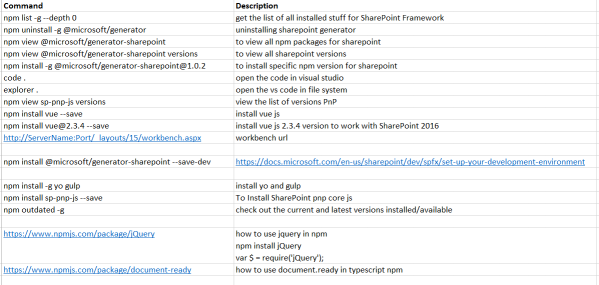
Some Useful commands for SPFx and Node JS